TOP
Description
Grips
Editing
Variables
Script example
Macro Example
3D
Comments
Coordinates
Description
There are two basic methods used for placing new geometry in Autocad.

You can use the mouse to pick a point on the screen, either choose freely where you want it or use one of the many snap options to either pick a point on other existing geometry, or a grid snap position
Or you can use direct keyboard entry to type in the coordinates of the new geometry points as you are creating them. And here again there are several methods depending on your system settings, you can use x and y positioning, or linear and angular values for example.
Puttin’ things just there
In order to use 3D coordinates , however it is a bit more work. You can of course snap to existing geometry if it has Z values, or set the ‘elevation’ variable so that objects inherit that as their Z value.
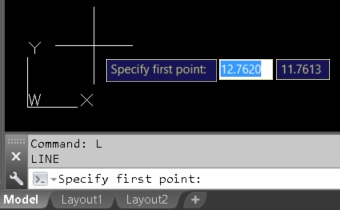
However getting at the Z coordinate isn’t so straight forward. And if you don’t already make use of Dynamic input I would highly recomend it.
When you are prompted for a pick point by Autocad and you fill in the coordinates using the dynamic prompt you are presented with 2 coordinate fields one for the X and one for the Y values of this first point.
If you are used to Dynamic input you should be aware that you can just enter numbers at the keyboard and these will be placed into the active field. From there you can click with the mouse into the second field, or use the ‘tab’ key to change the active field or a third method is use the ‘comma’ key to adavance to the next field. Using the mouse you can reselect either of the fields to edit the values, and with the ‘tab’ key the fields automatically switch the active field back and forth for editing.
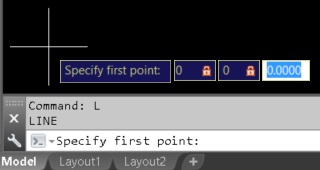
However the only way to get at the Z value is after you have entered a value into the second field then press the ‘comma’ key, at which point a third field becomes visible and active and this is where you can enter the Z value you want.
From this point on the ‘tab’ key will cycle through all 3 fields to allow editing.
Please be aware that before you can use the ‘comma’ key this way you have to input a number into the active field, if the active field has a light blue background and is in ‘text editing’ mode then pressing the ‘comma’ will only result in an error, with a red border around the current field
Grips
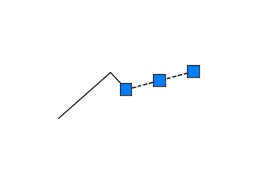
A line has two types of grips associated to it,
END grips and a MID grip.
When grip editing the END grips will allow you to distort the original line to change it’s position, angle and length.
The MID grip can be used to alter the placement, rotation and scale of the line.
When using osnaps from other objects a line can also display points for PERpendicular and NEArest, as well as INTersection and APParent intersection
Editing
When it comes to editing the coordinates of geometry the properties palette is probably the easiest to use. The typr of object will determine what is available in the palette
